Configuring Adyen as Payment Integration
Adyen option as payment integration is not publicly available (yet), and you should contact our customer success team in order to enable it for your account.
Autohost Adyen Configuration
Follow the steps below to setup an Adyen Merchant account in Autohost:
The Adyen account can be connected via the Security Deposit configuration in the Autohost Dashboard (if you don't see the Adyen option reach out to our customer success team to configure it to your account):
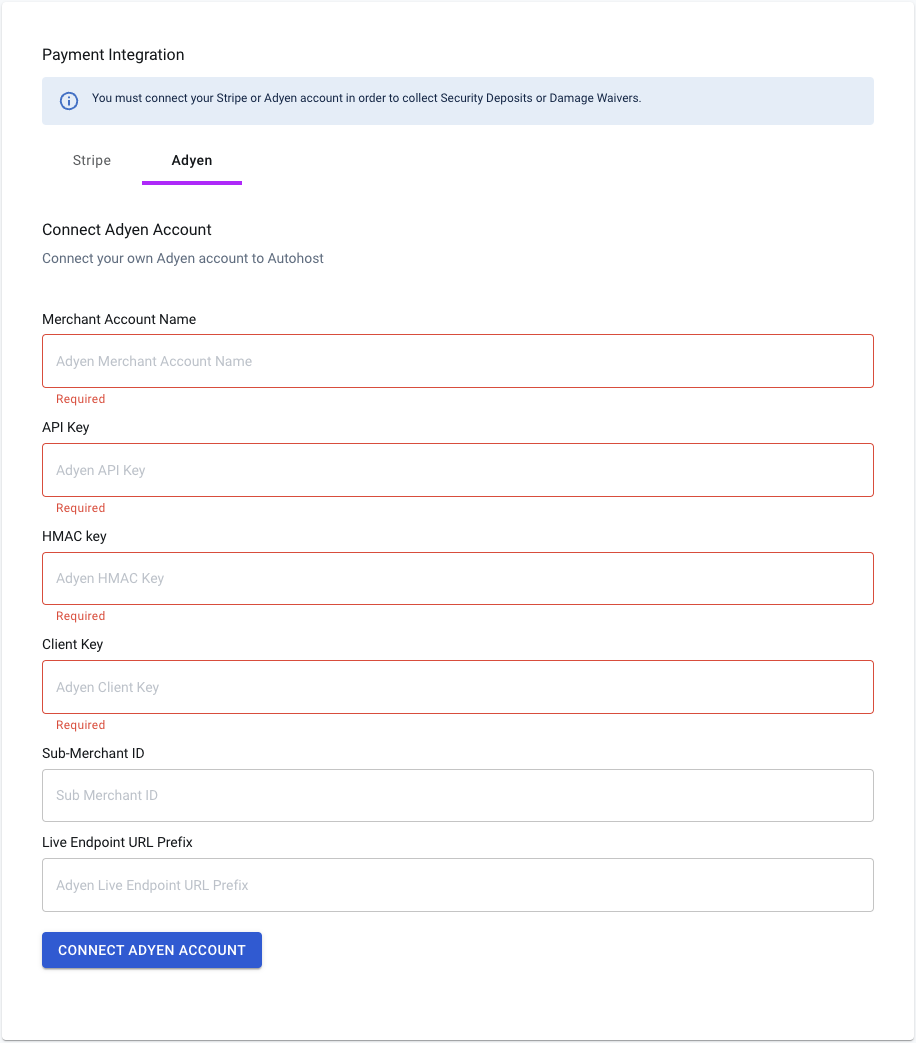
Autohost requires the highlighted (in red) fields to successfully connect to Adyen.
Note: the Live Endpoint URL Prefix field is ONLY required for the production environment.
Merchant Account Name
To ensure you use the correct Adyen merchant's name, follow the steps below:
- Log in to Adyen Customer Area.
- Go to Settings > Merchant accounts
- The Merchant Account Name is the information on the Account Code
- Copy this name and paste it to the Merchant Account Name field in Autohost
API Key
Autohost uses the API Key to perform authenticated actions on Adyen.
To generate an API key, you must have one of the following user roles in Adyen:
- Merchant admin role
- Manage API credentials
To generate your API key:
- Log in to Adyen Customer Area.
- Go to Developers > API credentials, and select the API credential username for your integration, for example ws@Company.[YourCompanyAccount].
- Under Server settings > Authentication select the API key tab.
- Select Generate API key.
- Select the copy icon and paste your API key in the API Key field in Autohost.
- Select Save changes.
💡 When you switch to your live environment, you must generate a new API key in your live Customer Area.
You can find more information here:
Webhook Configuration + HMAC Key
Autohost webhook API must be configured correctly in Adyen in order to perform updates on payments originating from the platform, therefore providing a seamless experience for the user.
The HMAC key is used to verify the signature of the webhook information, this will help us to confirm that the webhook was sent by Adyen and was not modified during transmission.
To configure Autohost webhook:
- Log in to Adyen Customer Area. To configure webhooks for a merchant account, switch to that merchant account.
- Select Developers > Webhooks.
- Select + Webhook.
- Under Recommended webhooks > Standard webhook select Add.
- Select the toggle to make the Standard webhook Enabled.
- Select the edit icon for Server configuration.
- Enter:
- URL:
- Method: JSON, HTTP Post, or SOAP.
- Encryption Protocol: TLSv1.2 or TLSv1.3
- Select Apply.
- Under Security > HMAC Key, select the edit icon. Select Generate. Copy the HMAC Key using the copy icon and paste it into the HMAC Key in Autohost. Select Apply.
- Select Save changes.
- Before closing, click on *Test Configuration, select
AUTHORISATIONfrom the list, and click on Test. If the test did not succeed, please reach out to the Autohost team.
For more information on how to setup Webhooks in Adyen, access this link:
Client Key
An Adyen client key is required in order to authenticate and identify the origin of the request from the screens.
Besides the client key, Adyen also requires the configuration of “Allowed Origins” which are domains from which Adyen expects to get client-side requests.
To configure the client key and origin:
- Log in to Adyen Customer Area.
- Go to Developers > API credentials, and select the credential username for your integration, for example ws@Company.[YourCompanyAccount].
- Under Client settings > Authentication select the Client key tab.
- Select Generate client key.
- Select the copy icon and paste it into the Client Key field in Autohost.
- Under Add allowed origins, enter the domains according to the environment you are configuring and select Add.
- DEV: https://gueststay.in
- PROD: https://verifyhub.org
- Select Save changes.
Sub-Merchant ID
Autohost supports sub-merchant configuration in Adyen, although this field is optional. Add the sub-merchant ID if you have multiple sub-merchants under your account in Adyen, and want the transactions to be marked for a specific sub-merchant.
Live Endpoint URL Prefix
💡 This field is only required for live (production environment) mode.
Obtain the endpoint URL prefix from your merchant account in Adyen (Live environment) and add it to the Live Endpoint URL Prefix in Autohost dashboard.
Completing the Configuration
Click on Connect Adyen Account to complete your configuration and connect your Adyen account to Autohost. After connecting, we performed a quick validation with the merchant name and API key provided, and you should see a message confirming that the account is connected if the information provided was validated successfully with Adyen.
Additional Configuration
In order for Autohost to perform all transaction validation and verification, there are some additional configurations that must be turned on in Adyen.
- Log in to Adyen Customer Area.
- Go to Developers > Additional Data.
- Toggle on the following fields:
- Acquirer:
- Acquirer result
- Raw acquirer result
- Card:
- Card bin
- Issuer Bin
- Card bin details
- Card summary
- Expiry date
- Risk:
- Fraud result
- Payment:
- Authorisation amount
- Authorisation amount (dynamic zero authorisation)
- Recurring details
- Merchant reference
- Include alias info
- Acquirer: